Turn Off Power
You always want to remember when you’re working on anything electrical, turn the power off at the breaker. Use your tester to make sure that it’s off after you’ve done that.
Remove Smoke Detector
The most common smoke detectors use a twist and lock method to hold the smoke detector on the mounting bracket. So, grab the detector firmly and twist counterclockwise. You should feel it release from the bracket and it will be hanging by the wiring harness.
Disconnect Wiring Harness from Detector
D
Depending on the style of your smoke detector, the wiring harness may slip on and off, while others may have a tab you need to press to get it to release.
Remove Old Baseplate
**Pro Tip: Next we want to remove the old base plate. Now, a lot of times these can be painted over because people will remove the smoke detector, but paint over the base plate if they’re painting the wall or ceiling. So, use a razor knife and score around the paint, this will really help prevent any peeling.
The base plate is usually held on by 2 screws. Sometimes you can just loosen the screws and just twist the plate off, other times you will need to remove the screws all the way to get it off. Now before you touch anything else, if your tester lights up or beeps, STOP and go back to your breaker panel and flip the breakers off until you find the right one. Use your tester and make sure the wires you’re working on are dead, or that they don’t have electricity going to them. Even if I know the circuit is dead, I like to double check every time.
Disconnect Wiring Harness from Wires
Now, the new wiring harness will usually have 3 wires coming off it, these are wires that connect with the wires in your box, and they should match the same color. You’ve got black (which is the hot wire), white (which is your neutral) and the 3rd wire, usually red (this is a communication wire for interconnected smoke detectors). This is the one that allows for them to communicate. So when one sounds the rest of them will go off.
**Pro Tip: Even though the ends come pre-stripped, I recommend stripping a little more insulation off. The wire on the wiring harness are stranded and I want as much of it to come in contact with my wires that are already twisted together.
** Pro Tip: To ensure you don’t have arcing from loose connections, be sure to twist your existing wires together. Use your pliers and always twist them clockwise because that is the direction you will twist the wire nuts and you want to make sure your connections get as tight as possible. Place the wire from the wiring harness next to its corresponding color of the wires coming out of the box. Slide them inside the wire nut and twist clockwise until it’s tight. I usually twist until I can’t twist it anymore. You DO NOT want a loose connection. After all the wires are connected, fold the extra wire back into the box so that the only thing hanging out is the new wiring harness.
Attach the New Base Plate
The next step is to install the new base plate. Your new base plate will have different hole configurations. You should be able to slip it over the screws, turn until it locks in place and then tighten the screws down.
Plug in the New Detector
Next, you’re going to plug the wiring harness into the back of the smoke detector. Line the wiring harness up with the prongs on the back of the smoke detector and push until it snaps into place.
Twist Detector on Baseplate
Next, you need to put the smoke detector on the new base plate by twisting it clockwise until it locks in place. Be sure to help direct the dangling wires back into the opening so they don’t get pinched between the detector and the base plate.
Remove Battery Spacer
Some smoke detectors have a plastic strip and others have a big red arrow made of cardboard that acts as a spacer. This helps to keep the battery from making the smoke detector live during the shipping and storage process. Go ahead and remove those now.
Turn on Power and Test
Our last step is to turn the power back on and test the smoke detectors by pressing the test/hush button (the big button in the middle) for a minimum of 5 seconds. Then all interconnected, battery backed up alarms should respond.
So, that’s how you replace a smoke detector. As you can see, with a little bit of information and instruction this is something you can totally do yourself. But, if you ever feel like you have gotten in over your head, STOP and call an electrician you trust for some help.
If you’ve found this information helpful and informative, give us a thumbs up. It’s the only way we know you like our videos and we’ll keep making them. If you need to know how to do anything else with your electrical, plumbing, heating or air conditioning system, leave your suggestions in the comments below.
Video Transcript
How To Replace A Smoke Detector
Is it supposed to be called a smoke detector or a smoke alarm? I have no idea, but in this video we’ll show you how to replace a smoke alarm or how to replace a smoke detector – whatever you want to call it. Come on. . .
Hip hip hooray, it’s replace your smoke detector day! Just like our other how-tos, you’ll find navigation at the top of the video. If you want to jump straight to the project and skip all my blabbing, just click up there.
Now the reason I said this video will show you how to replace a smoke alarm or how to replace a smoke detector, is because I got my start in the construction game as an electrician and we call them smoke detectors, but a lot of people call them smoke alarms. Both are accurate.
The point of this video is to show you how to replace a smoke detector and it’s geared towards the average homeowner. So, I decided to show you how to replace a smoke detector that you can pick up at the hardware store. It’s the kind in my house and this has been on my honey-do list for a long time. I know my wife is going to be pretty happy that we’re making this video.
Now, if your house was built after 1975, it should have some type of smoke detector in it. Nowadays, they’re hard wired in with a battery backup.
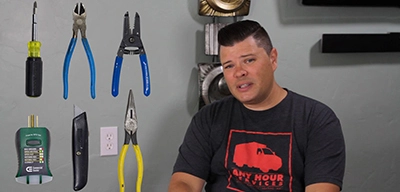
Tools
The tools you’ll need to replace a smoke detector are; Screwdriver, Utility Knife, Tester, Wire strippers, Pliers and also going to need some wire nuts. if you’re too short to reach, you’re going to need a Ladder.
You’ll want to have a new smoke detector. It should come with everything you need in the box. I know you will spend the hours that it takes to read that — the owner’s manual. It will have a new alarm with a new battery inside, this mounting plate that goes on the wall that it screws into, and this wiring harness.
Step 1 – Turn off power
Safety first! You always want to remember when you’re working on anything electrical, turn the power off at the breaker. Use your tester to make sure that it’s off after you’ve done that. We’ll show you how to do that once we pull the smoke detector from the mounting bracket.
Step 2 – Remove smoke detector
The most common smoke detectors use a twist and lock method to hold the smoke detector on the mounting bracket. So, grab the detector firmly and twist counter-clockwise. You should feel it release from the bracket and it will be hanging by the wiring harness.
Step 3 – Disconnect wiring harness from detector
Depending on the style of your smoke detector, the wiring harness may slip on and off, while others may have a tab you need to press to get it to release.
Step 4 – Remove old baseplate
**Pro Tip
Next we want to remove the old base plate. Now, a lot of times these can be painted over because people will remove the smoke detector, but paint over the base plate if they’re painting the wall or ceiling. So, use a razor knife and score around the paint, this will really help prevent any peeling.
The base plate is usually held on by 2 screws. Sometimes you can just loosen the screws and just twist the plate off, other times you will need to remove the screws all the way to get it off.
Now before you touch anything else, if your tester lights up or beeps, STOP and go back to your breaker panel and flip the breakers off until you find the right one. Use your tester and make sure the wires you’re working on are dead, or that they don’t have electricity going to them. Even if I know the circuit is dead, I like to double check every time.
Step 5 – Disconnect wiring harness from wires
The next step is to disconnect the old wiring harness from the wires. If you pull the old wires out of the box, you should see the wiring harness connected to the wires using wire nuts. Unscrew the wire nuts and remove the old wiring harness.
Step 6 – Connect new wiring harness to wires
Now, the new wiring harness will usually have 3 wires coming off it, these are wires that connect with the wires in your box and they should match the same color. You’ve got black (which is the hot wire), white (which is your neutral) and the 3rd wire, usually red (this is a communication wire for interconnected smoke detectors). This is the one that allows for them to communicate. So when one sounds the rest of them will go off.
**Pro Tip: Even though the ends come pre-stripped, I recommend stripping a little more insulation off. The wire on the wiring harness are stranded and I want as much of it to come in contact with my wires that are already twisted together.
** Pro Tip: To ensure you don’t have arcing from loose connections, be sure to twist your existing wires together. Use your pliers and always twist them clockwise because that is the direction you will twist the wire nuts and you want to make sure your connections get as tight as possible.
Place the wire from the wiring harness next to its corresponding color of the wires coming out of the box. Slide them inside the wire nut and twist clockwise until it’s tight. I usually twist until I can’t twist it any more. You DO NOT want a loose connection.
After all the wires are connected, fold the extra wire back into the box so that the only thing hanging out is the new wiring harness.
Step 7 – Attach the new base plate
The next step is to install the new base plate. Your new base plate will have different hole configurations. You should be able to slip it over the screws, turn until it locks in place and then tighten the screws down.
Step 8 – Plug in the new detector
Next, you’re going to plug the wiring harness into the back of the smoke detector. Line the wiring harness up with the prongs on the back of the smoke detector and push until it snaps into place.
Step 9 – Twist detector on baseplate
Next, you need to put the smoke detector on the new base plate by twisting it clockwise until it locks in place. Be sure to help direct the dangling wires back into the opening so they don’t get pinched between the detector and the base plate.
Step 10 – Remove battery spacer
Some smoke detectors have a plastic strip and others have a big red arrow made of cardboard that acts as a spacer. This helps to keep the battery from making the smoke detector live during the shipping and storage process. Go ahead and remove those now.
Step 11 – Turn power on and test
Our last step is to turn the power back on and test the smoke detectors. Now, that’s where this information comes in handy (point to owner’s manual). I don’t know how you find anything in here, it took me awhile. But it does tell you how to test.
It says, “Test to ensure proper operation by pressing the test/hush button (the big button in the middle) for a minimum of 5 seconds. Then all interconnected, battery backed up alarms should respond. Okay, it’s probably going to be a loud process. I’m going to go turn the power on and then we’ll go ahead and test this.
Okay, power’s back on. We’re going to go ahead and push this button, hold it for 5 seconds and see what happens. Well, all the alarms in the house are sounding. That means they’re communicating, that’s a good sign. And that’s how you replace a smoke detector.
As you can see, with a little bit of information and instruction this is something you can totally do yourself. But, if you ever feel like you have gotten in over your head, STOP and call an electrician you trust for some help.
If you’ve found this information helpful and informative, give us a thumbs up. It’s the only way we know you like our videos and we’ll keep making them. If you need to know how to do anything else with your electrical, plumbing, heating or air conditioning system, leave your suggestions in the comments below.
Don’t forget to subscribe – we need you to subscribe! We put a big button down there (pointing below). Is it spelled right? Subscribe – click that button!
Have a great day and thanks for watching.


